Example Asbestos Removal Projects in Kent

Each example shows one asbestos job: the building, which materials were sampled and which came back positive, how the work runs, the days it takes and roughly what it costs. About four in ten Kent homes are older than 1980, and even within one house results can differ, so every example begins with a test.

Soaked furnace wrap cleaned up after a basement flood

Example project
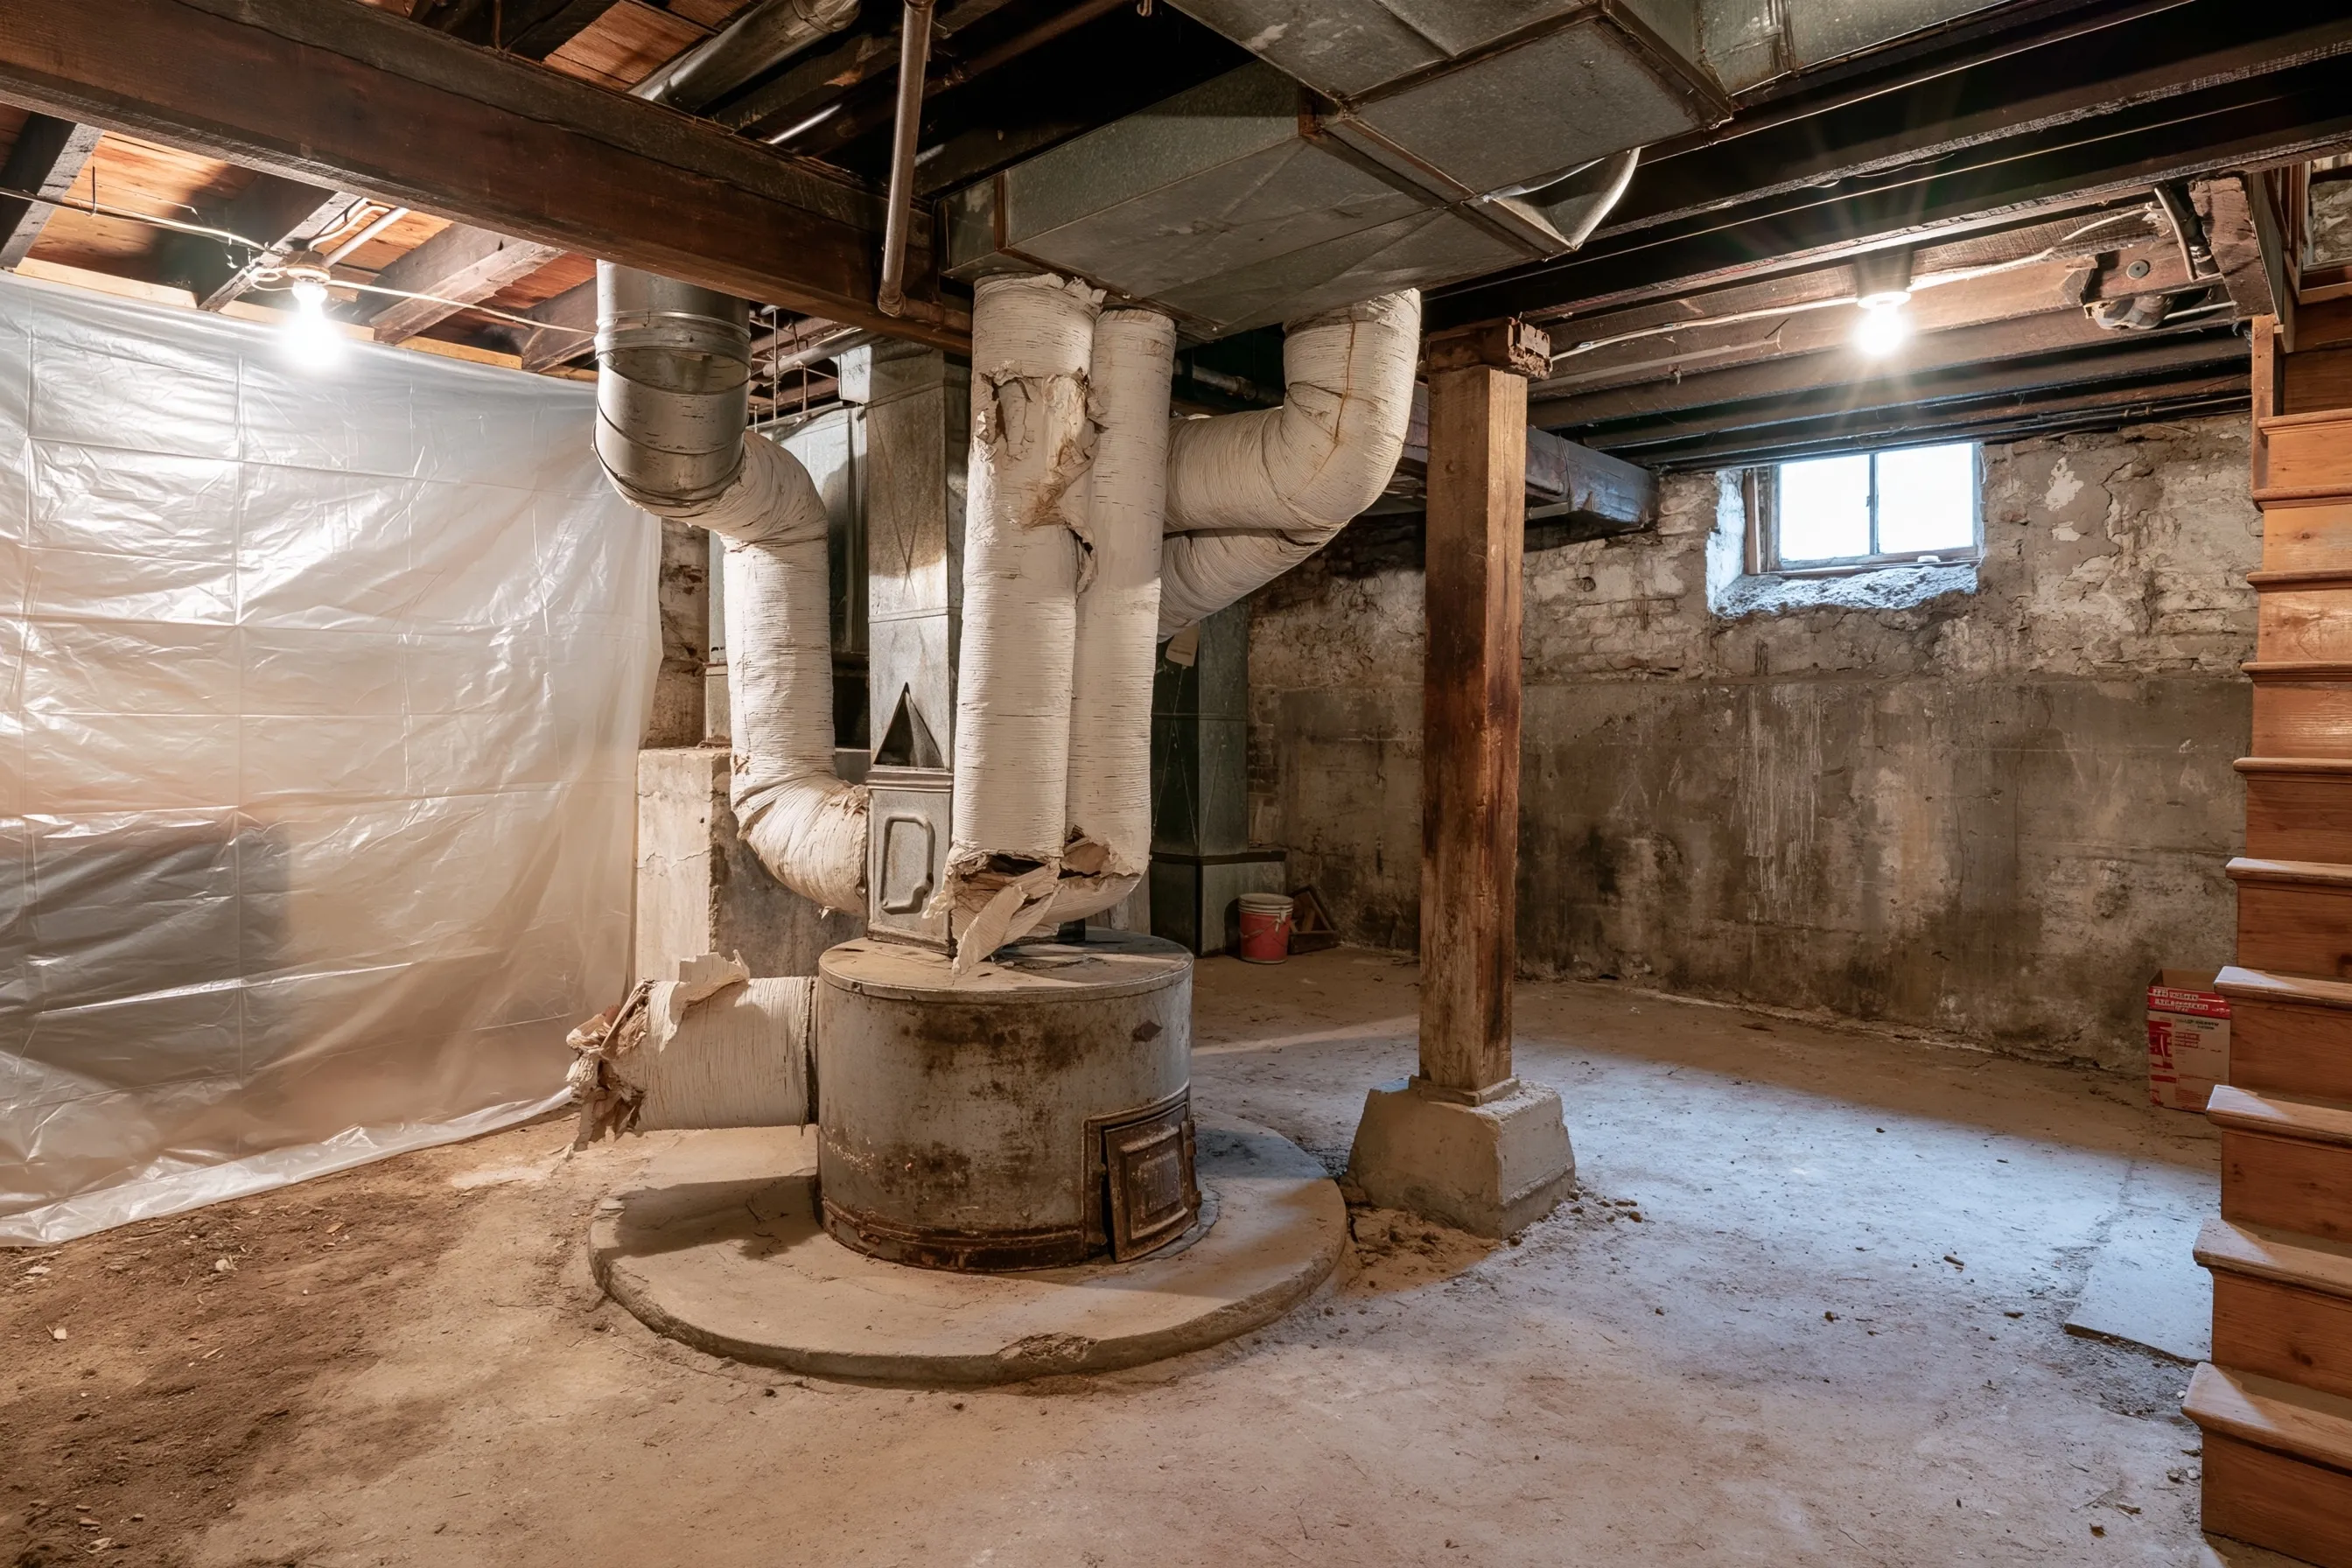
Old basement with an octopus-style furnace in the middle and white-wrapped ducts branching out toward the joists
Home
1940s house in Kent with an unfinished basement
Original request
Dry out and restore the basement after a failed sump pump let the water rise to the furnace
Testing
A fallen piece of soggy wrap from the floor and a sample of the furnace jacket
Found
Asbestos in the wrap and in the jacket
Material
The furnace jacket and the soaked wrap on the three lowest duct arms, about 60 sq ft in all
Agency notice
Filed, since 60 sq ft is over the 48 sq ft mark
Timeline
Filing, then two days of work; the drying company and heating contractor follow
Cost
$5,600

Scope of work

Plastic around the furnace and under the wet duct arms, the fallen pieces misted and bagged first, the soaked wrap and jacket taken off wet, the old furnace cut free and bagged, the sound upper wrap left, disposal, a HEPA clean and an air test. Drying, the replacement furnace and any insurance paperwork are separate.

Project overview

In this example, a sump pump fails in the basement of a 1940s house in Kent and the water rises to the furnace and the lowest duct arms. Their white wrap is soaked, sagging and coming off in pieces on the floor. The drying company stops and asks for a test of a fallen piece and of the furnace jacket, and both are positive.

The fallen pieces are misted and bagged first. The soaked wrap on the three lowest arms and the jacket come off wet, about 60 sq ft in all, so the notice goes to Puget Sound Clean Air Agency. The wrap higher up is dry and sound, so it stays with its cut ends sealed, and the drying company and the heating contractor can then start.

The goal

The goal is a basement ready for drying and a new furnace, with the soaked wrap and the old jacket gone and the dry wrap sealed.

Process

  1. Same day Water pumped out, fans kept off the wet wrap, samples taken.
  2. Before work Results come back; the filing goes in with the insurer’s file number noted.
  3. Day one Plastic up, fallen pieces bagged, soaked wrap and jacket taken off wet.
  4. Day two The old furnace cut free, cut ends sealed, HEPA clean and an air test.

Planning right

  • Keep fans and dehumidifiers pointed away from wet wrap until it is tested.
  • Do not sweep or shop-vac the fallen pieces.
  • Ask the insurer whether testing and removal belong to the water claim.
  • Write down where dry wrap remains, for the next time work is done in the basement.
Get a free quoteMore about asbestos insulation removal

Two of three ceilings test positive on a split-level upper floor

Example project

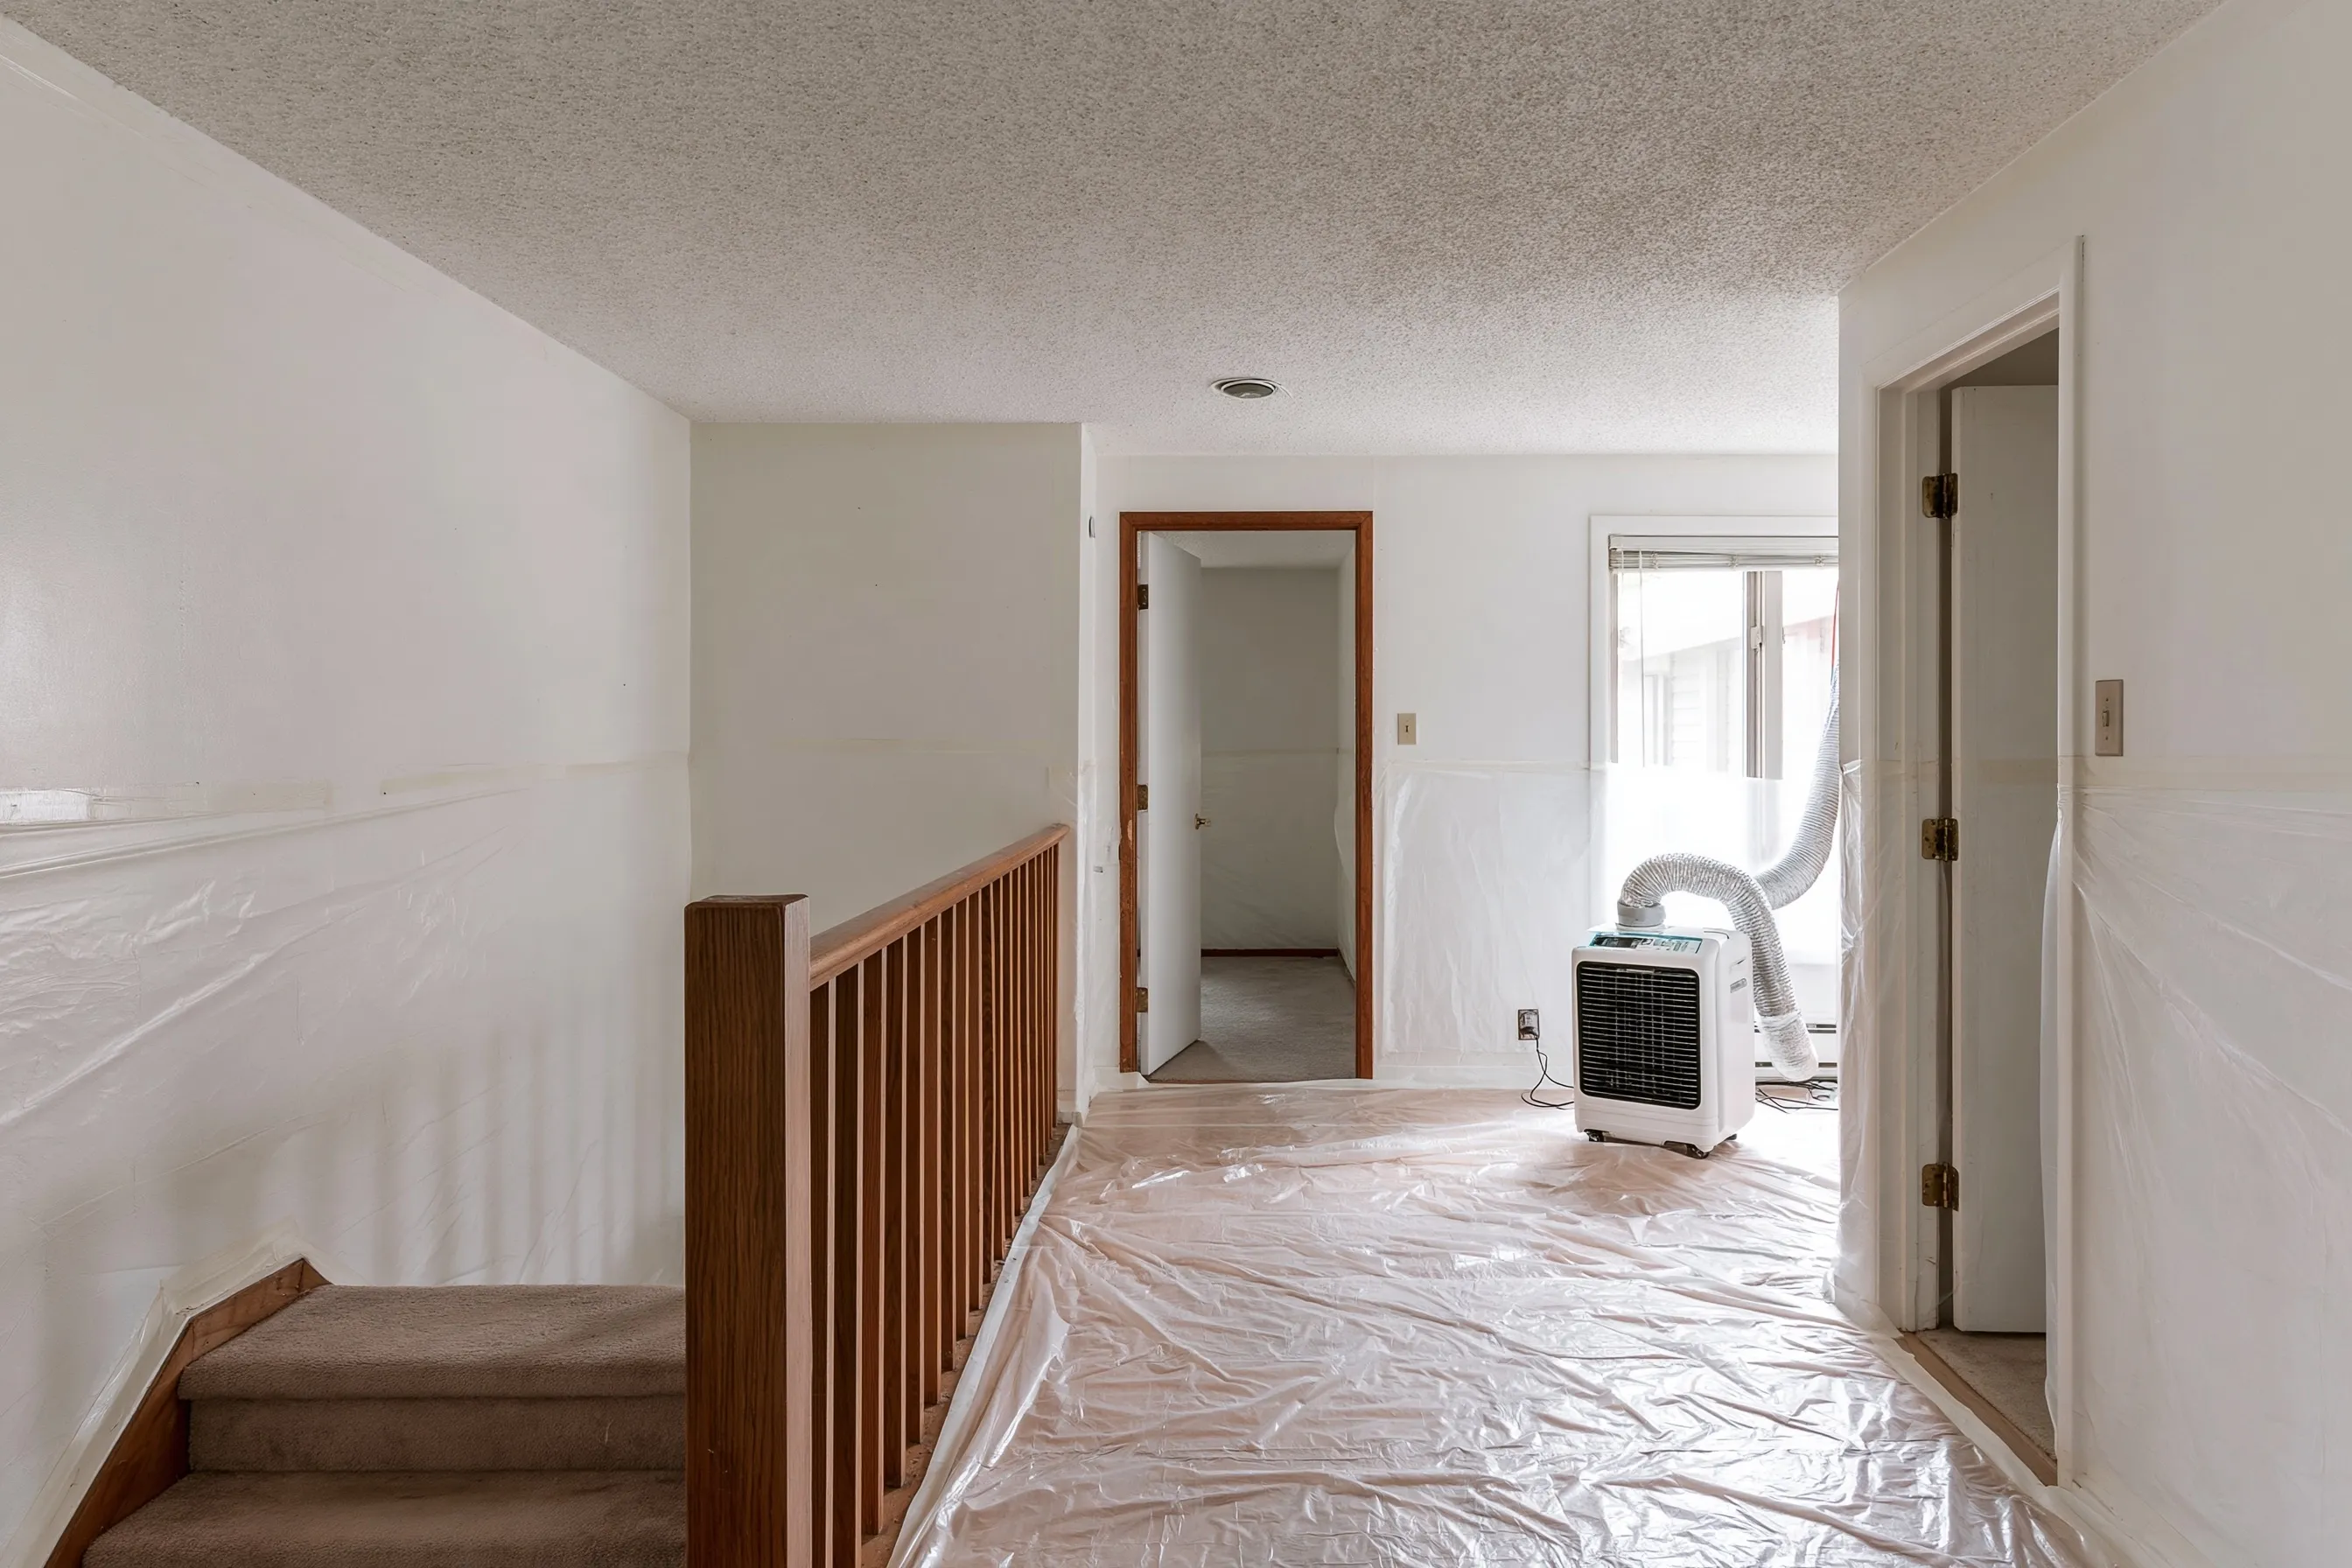
Split-level upstairs with painted popcorn overhead, walls and floor in plastic sheeting, an air filter ducted to the window and the half-flight down beside it
Home
1960s split-level house in Maple Valley
Original request
Smooth ceilings in the hall, bedrooms and bath on the upper floor
Testing
One sample from the hall, a bedroom and the bath: asbestos in the hall and bedroom texture
Clear
The bath texture, redone in a later remodel
Area
About 230 sq ft of painted texture in the hall and one bedroom
Timeline
Hall and bedroom filed with the agency, then scraped over two days
Cost
$4,100

Scope of work

Plastic over the floor and walls, a filtered air unit venting out a window, the painted texture soaked and scraped, sealed bags, a HEPA vacuum and wet wipe, and disposal. The clear bath ceiling and the final skim coat are left to the drywall contractor.

Project overview

In this example, the upper floor of a 1960s split-level in Maple Valley has three textured ceilings the owners want smooth. The hall, bedroom and bath ceilings all look alike, but the bath was redone in a later remodel. One sample from each ceiling goes to the lab.

The hall and the bedroom come back positive, and the bath does not. Those two ceilings are done under asbestos rules after the notice to Puget Sound Clean Air Agency, with plastic over the floor and walls and a filtered air unit venting out a window. The bath can be scraped by the drywall contractor the usual way.

The goal

The goal is asbestos work only where the lab found it, with the bath ceiling handled as normal drywall work.

Process

  1. Before work Three samples, one per ceiling; notice filed for the hall and bedroom.
  2. Day one Hall and bedroom sheeted, the air unit set in a window, painted texture soaked.
  3. Day two Texture scraped and bagged, both rooms cleaned and checked.
  4. Then The drywall contractor does the bath and skims all three.

Planning right

  • Ceilings that look the same can test differently. Sample each one.
  • Paint seals the texture, so water takes longer to soak in; mention any coats of paint when you call.
  • Keep the clear results. The drywall contractor will want to see them.
  • Seal the stair opening so dust cannot drift to the lower floor.

Get a free quoteMore about asbestos popcorn ceiling removal

Floor tile and adhesive off an office slab before polished concrete

Example project

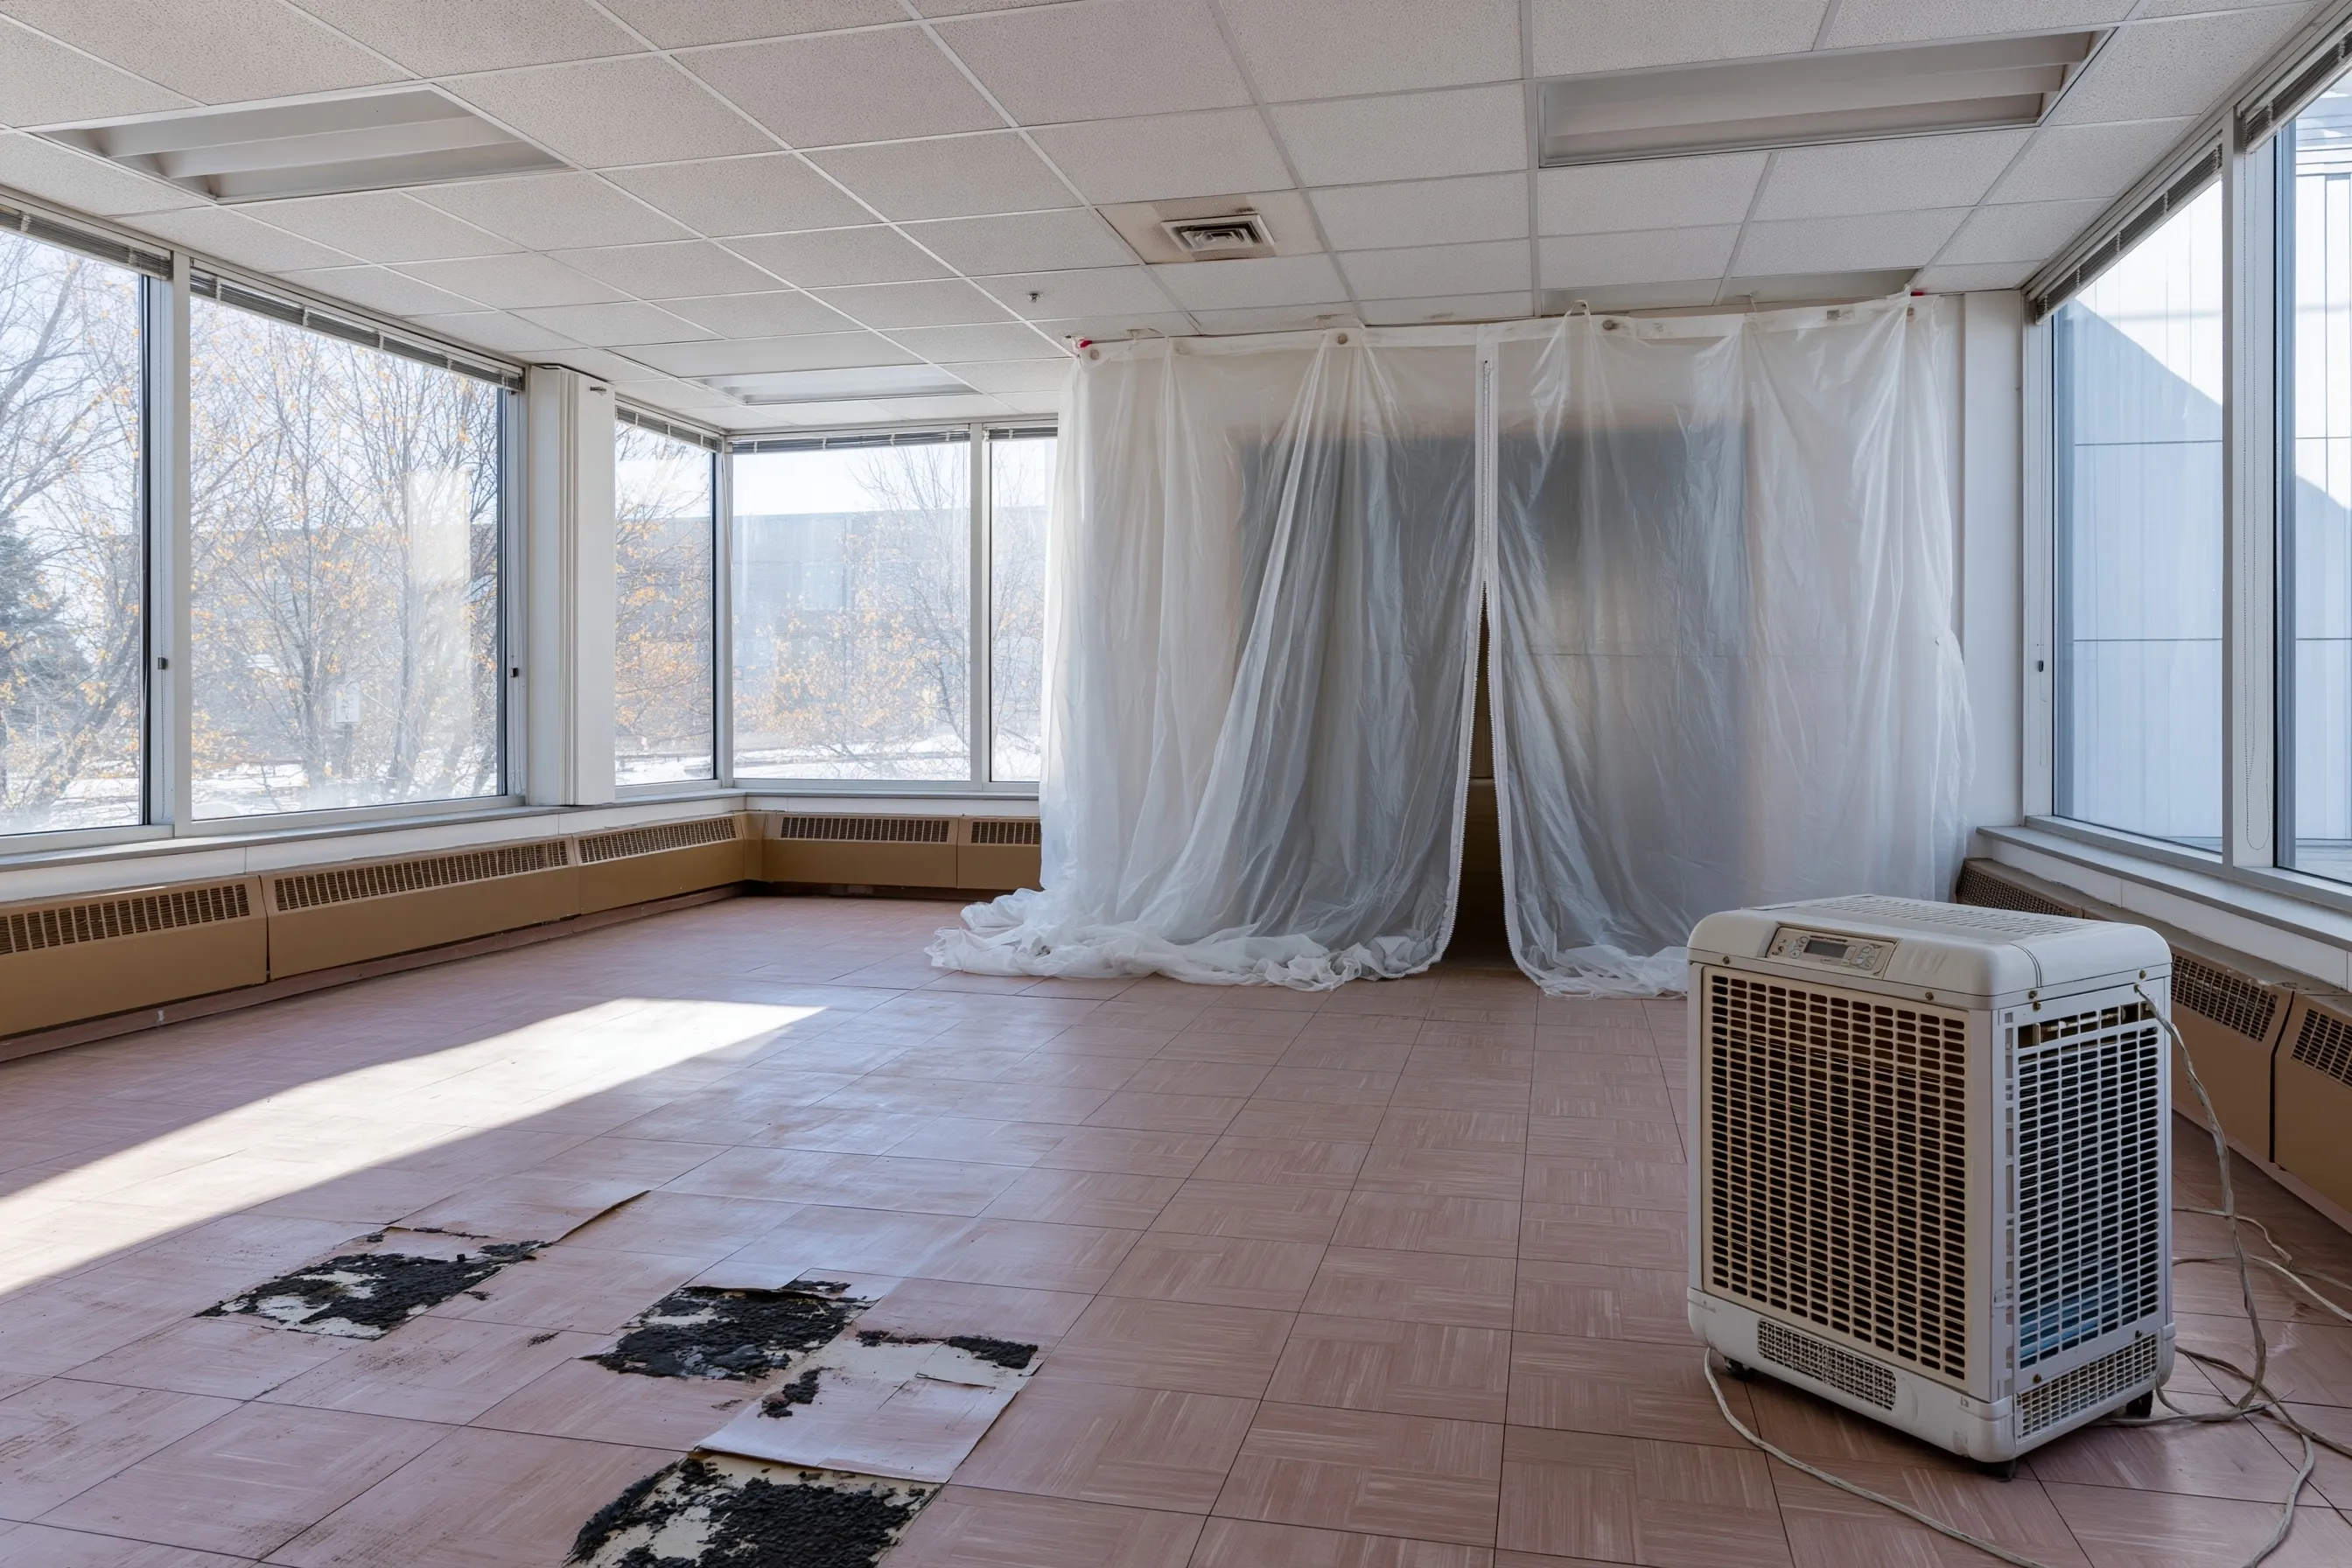
Vacant office with some floor tiles pulled up to reveal dark glue, a doorway hung with plastic and an air filter machine
Building
1970s commercial building in Kent; the office windows and ceiling were replaced in a later update
Original request
Polished concrete floors in an office the owner will use for their own business
Testing
Inspector’s office survey: the original floor tile is clear, but the black glue under it is positive
Area
About 1,000 sq ft of floor
Setup
Plastic hung over the office door and a filtered air unit running
Timeline
Survey, three removal days, and no grinding until the glue is gone
Cost
$14,100

Scope of work

A sealed work area with a plastic doorway, a filtered air unit, the clear tile lifted and bagged as ordinary waste, the black adhesive taken fully off the slab by wet scraping without grinding, sealed bags, disposal, a HEPA clean and an air test. Grinding and polishing are priced by the concrete contractor; the survey has its own fee.

Project overview

In this example, a business owner in Kent wants polished concrete in a 1,000 sq ft office in a 1970s building. The glass and the drop ceiling are newer, while the floor tile dates from when the building opened. Polishing means grinding the slab, and grinding over old adhesive would throw its dust into the air. The survey finds the tile clear and the black adhesive under it positive.

So the glue has to come off before any grinder arrives. The clear tile is lifted first, and the adhesive is taken fully off the slab by wet scraping. Once the agency question is settled and the air samples pass, the concrete crew can start grinding.

The goal

The goal is a bare, clean slab ready for grinding and polishing, with no old adhesive left to turn into dust.

Process

  1. Week one Inspector’s visit; results back within the week.
  2. Before work Notice confirmed with the agency; the concrete crew booked for after the air test.
  3. Days one and two Doorway sealed, air unit running, clear tile lifted and bagged.
  4. Day three Adhesive scraped off the slab wet, HEPA clean and an air test.

Planning right

  • Never let a grinder touch a slab that still has old black adhesive on it.
  • Ask how the slab will be checked for leftover adhesive before polishing.
  • Polished concrete shows every stain. Talk to the concrete crew about what may show through.
  • Hand the survey and air results to whoever manages the building next.

Get a free quoteMore about commercial asbestos abatement

Cement siding off two garage walls for a workshop window and door

Example project

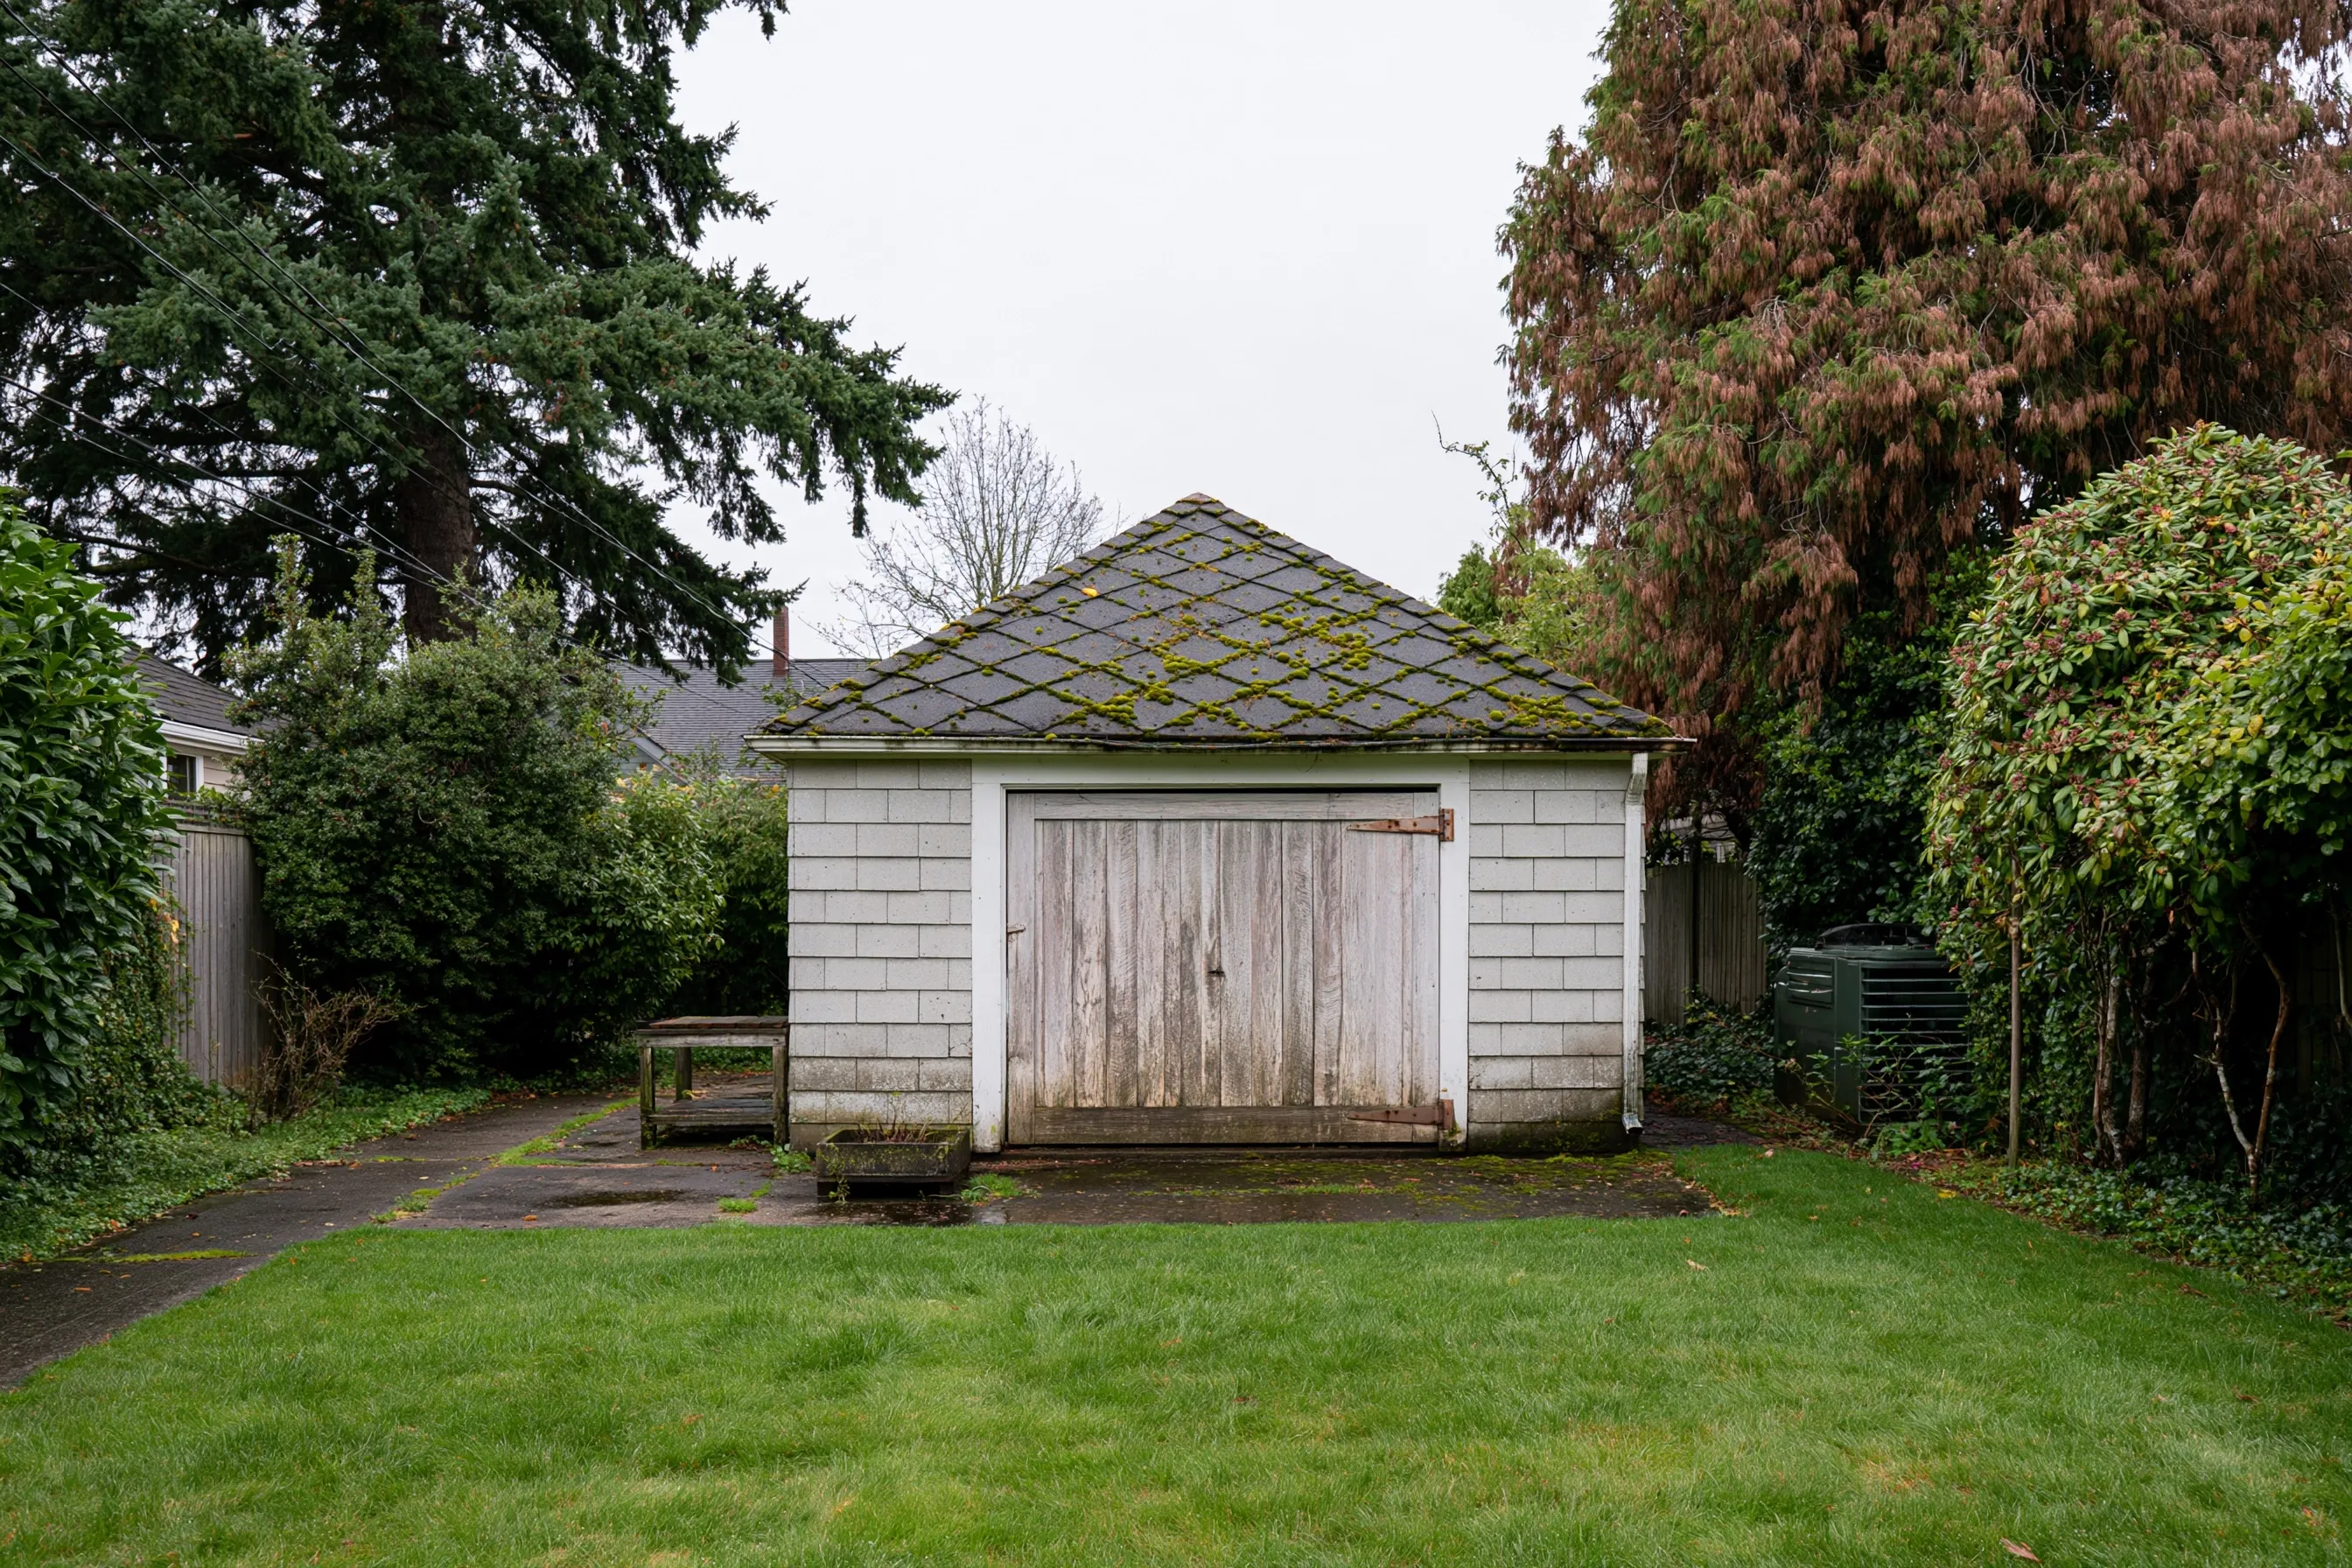
Weathered backyard garage with green moss on its cement shingle roof and gray cement shingles on the walls
Home
Kent house with a 1950s detached one-car garage
Original request
Turn the garage into a workshop with a new window and a side door
Testing
Siding and roofing each sampled; asbestos in both
Area
About 270 sq ft, the two walls where the openings go; the roof stays
Agency notice
Two walls listed in a notice to the agency
Timeline
A day and a half on the walls; the carpenter starts after
Cost
$4,300

Scope of work

Sheeting on the grass, just the two chosen walls soaked and unnailed panel by panel, the bundles wrapped and taken away, and the lawn combed for chips. Framing, windows, door and new siding are the carpenter’s; the roof waits for its own survey.

Project overview

In this example, the owner of a 1950s detached garage in Kent wants to use it as a workshop, with a window for light and a side door. Cutting those openings through cement siding would break it, so the siding and a roof shingle are tested, and both are positive.

With the filing made, panels come off only the two walls getting openings, soaked first so each one lifts out whole. The other walls and the roof stay as they are. The carpenter frames the openings and covers the two walls with new siding.

The goal

The goal is two bare garage walls ready for a new window and door, with the rest of the garage left untouched.

Process

  1. Before work Samples sent; filing made; benches and shelves pulled away from those two walls.
  2. Day one Lawn sheeted, panels on the side wall soaked and unnailed one at a time.
  3. Day two The back wall’s panels off by noon, bundles loaded, lawn checked.
  4. Then The carpenter frames the window and door and re-sides the two walls.

Planning right

  • Never cut a window or door through cement siding. Take the panels off first.
  • Leave the mossy roof alone. Scraping or pressure-washing breaks cement shingles.
  • Ask whether the new siding can match the old walls once painted.
  • Replacing that cement roof later means another survey first, then a separate price.

Get a free quoteMore about asbestos siding and roofing removal

Ceiling texture out before a daylight basement becomes an in-law suite

Example project

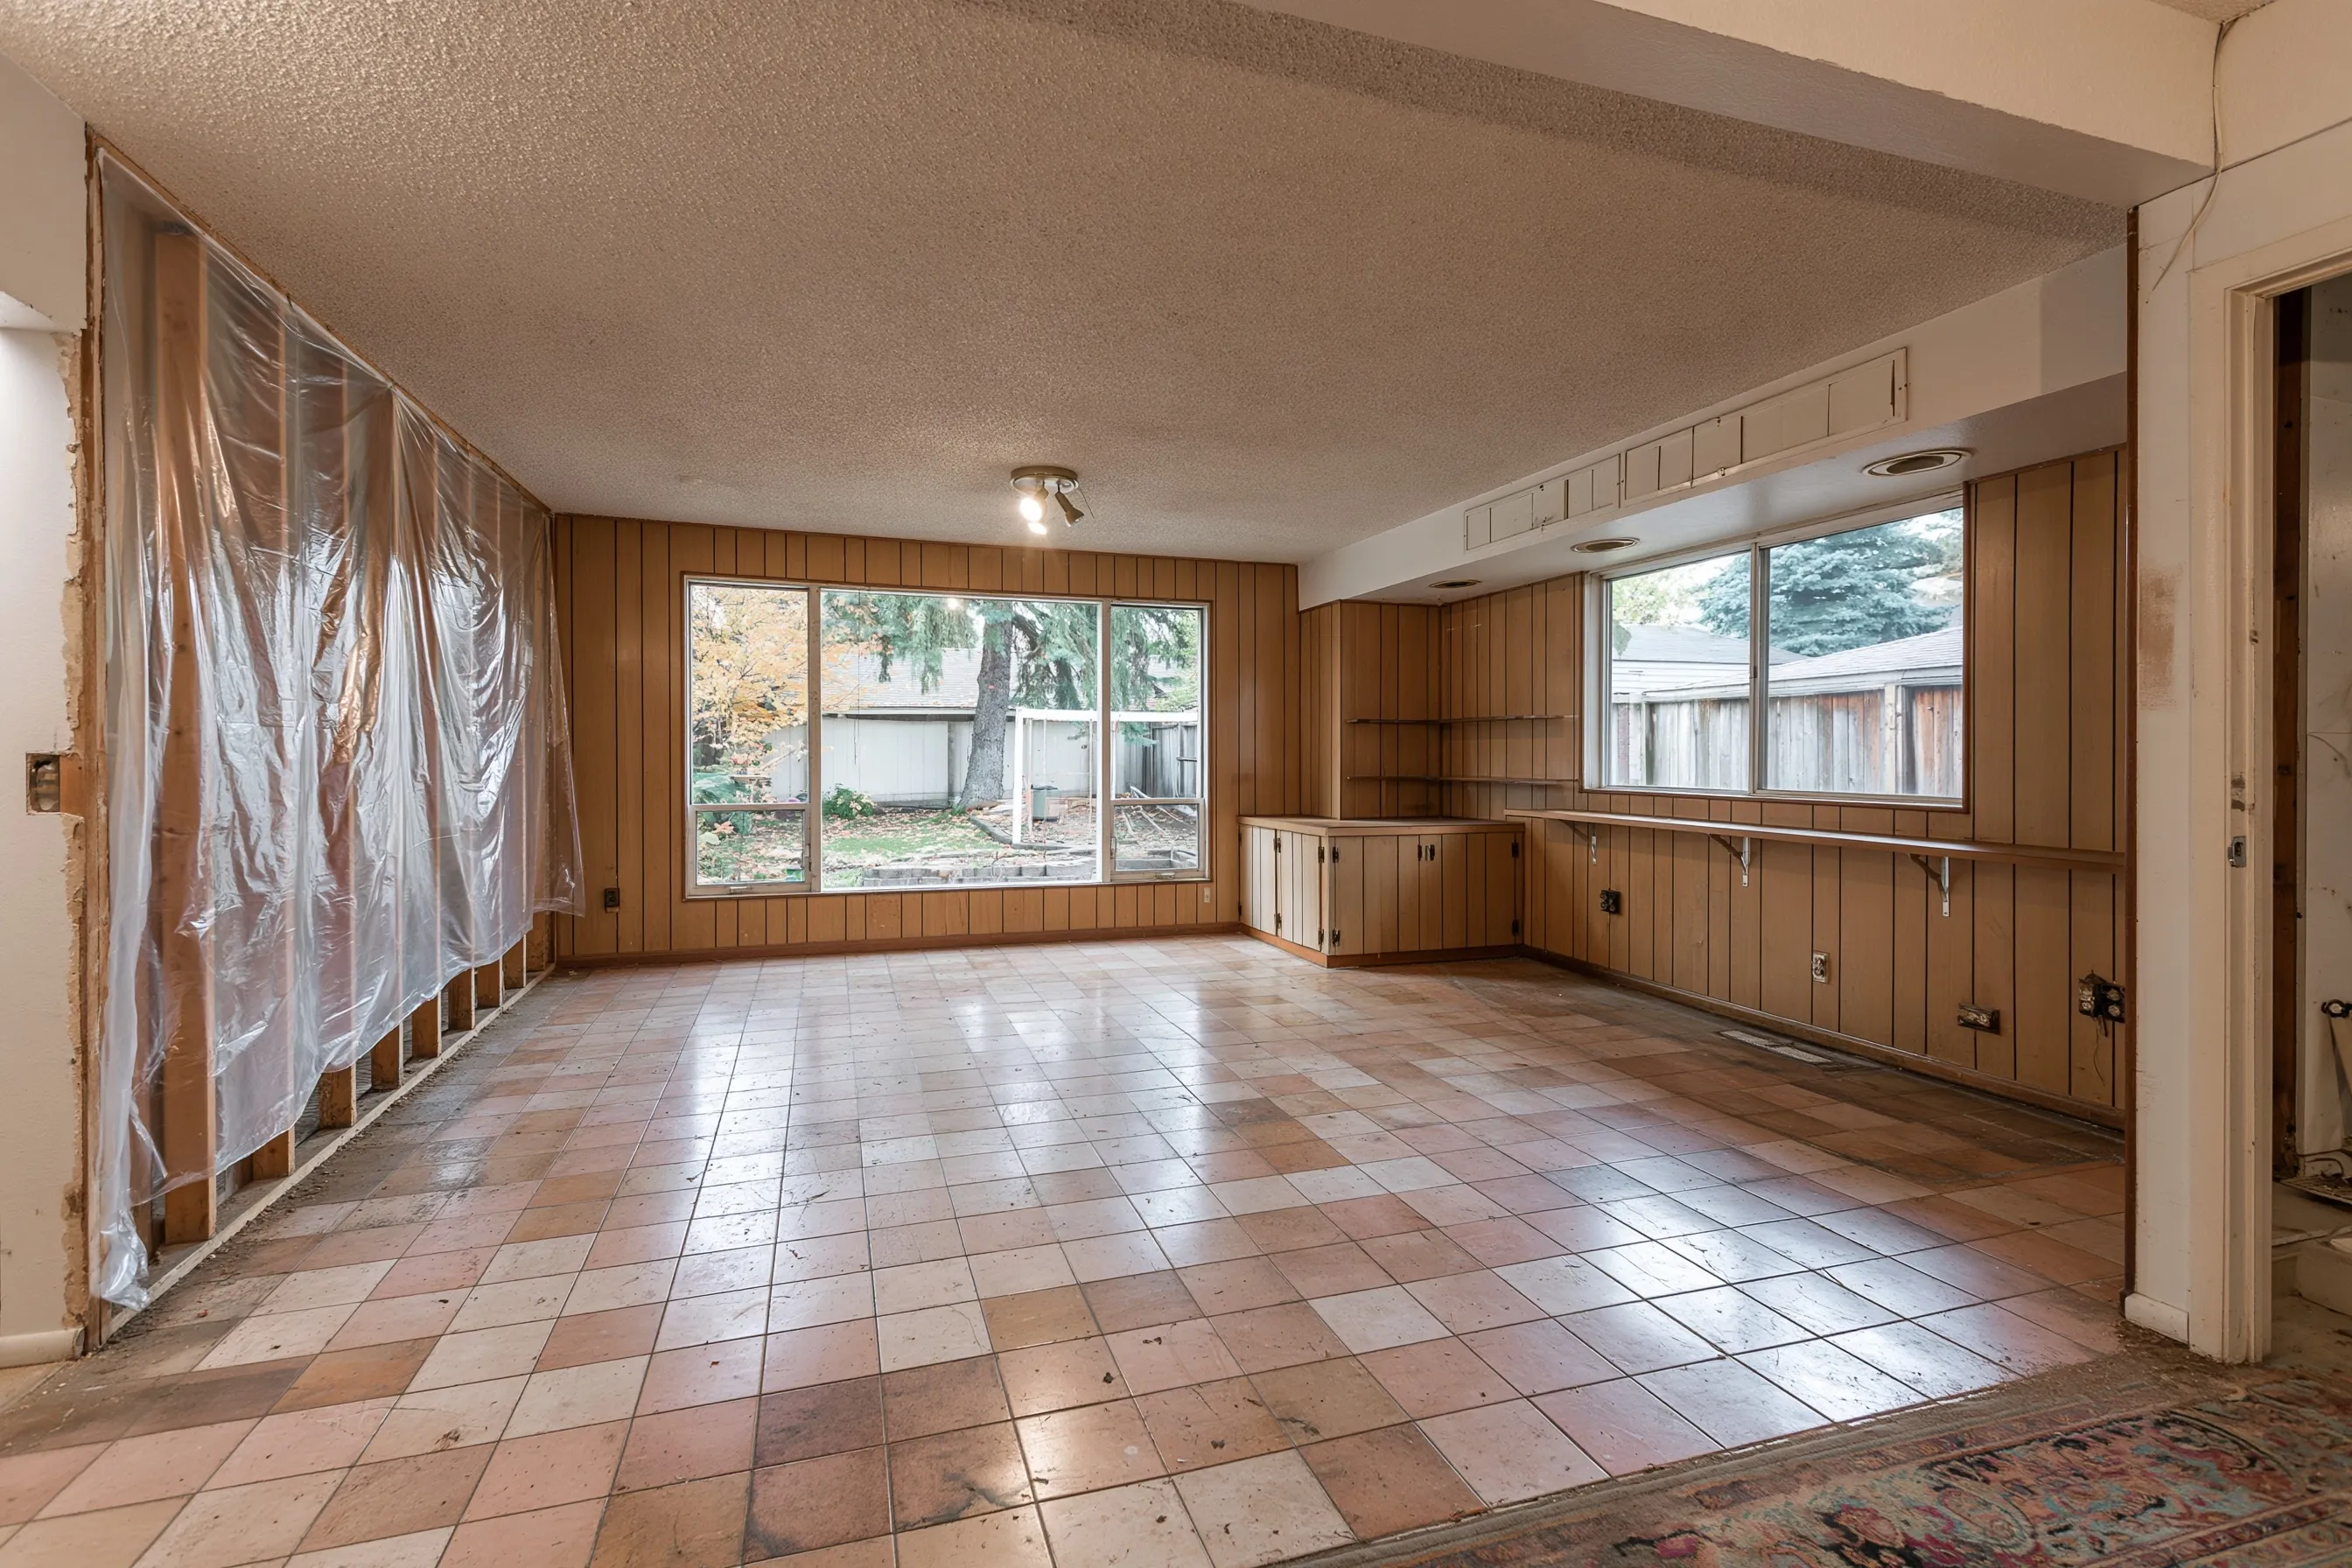
Daylight basement den in a 1960s house, popcorn-style ceiling, old floor squares and the first sheets of plastic going up
Home
1960s split-entry house in Covington with a daylight basement
Room
Lower family room, about 280 sq ft, with big ground-level windows and a textured ceiling
Original request
Turn the lower family room into an in-law suite with a kitchenette
Testing
Ceiling texture, floor squares and the kitchenette wall compound sampled before the plans are final
Found
Asbestos in the ceiling texture and the old floor squares; none in the kitchenette wall
Work
About 280 sq ft of ceiling texture removed inside plastic; the floor squares stay, intact, under the new floating floor
Timeline
The ceiling is filed with the agency and done in two days
Cost
$4,800

Scope of work

Plastic over the floor and walls and at the stair, a filtered air unit, the ceiling texture wetted and scraped, sealed bags, disposal, a HEPA clean and a final check. The floor, walls and the remodel itself are handled by the remodeler and priced separately.

Project overview

In this example, the owners of a 1960s split-entry house in Covington are turning the daylight basement family room into an in-law suite with its own kitchenette. The ceiling texture, the old floor squares and the joint compound on the wall where the kitchenette goes are sampled before the plans are final.

The lab marks the ceiling and the floor squares as positive. The ceiling comes off first under plastic, after the notice to Puget Sound Clean Air Agency. The floor squares are sound, so they stay in place under a new floating floor, and the remodeler opens the kitchenette wall for plumbing the usual way.

The goal

The goal is a lower floor ready for the in-law suite, with the positive ceiling out and the floor squares covered before the remodel begins.

Process

  1. Before work Three materials sampled; notice filed for the ceiling.
  2. Day one Room sealed, stair covered, ceiling texture wetted and scraped.
  3. Day two Bags sealed and hauled, HEPA clean and a visual check.
  4. Then The remodeler lays the floating floor over the old squares and starts on the walls and kitchenette.

Planning right

  • The floor result changes the remodel plan; hand it to the remodeler so nobody sands or pulls the old squares.
  • A kitchenette means new plumbing and wiring through a wall. Make sure that wall was sampled.
  • The ceiling goes first, so later dust from the remodel does not mix with it.
  • Ask the remodeler to plan the new ceiling finish before the texture comes off.

Get a free quoteMore about asbestos removal before a remodel or tear-down

A strip of old basement tile out for an interior drain

Example project

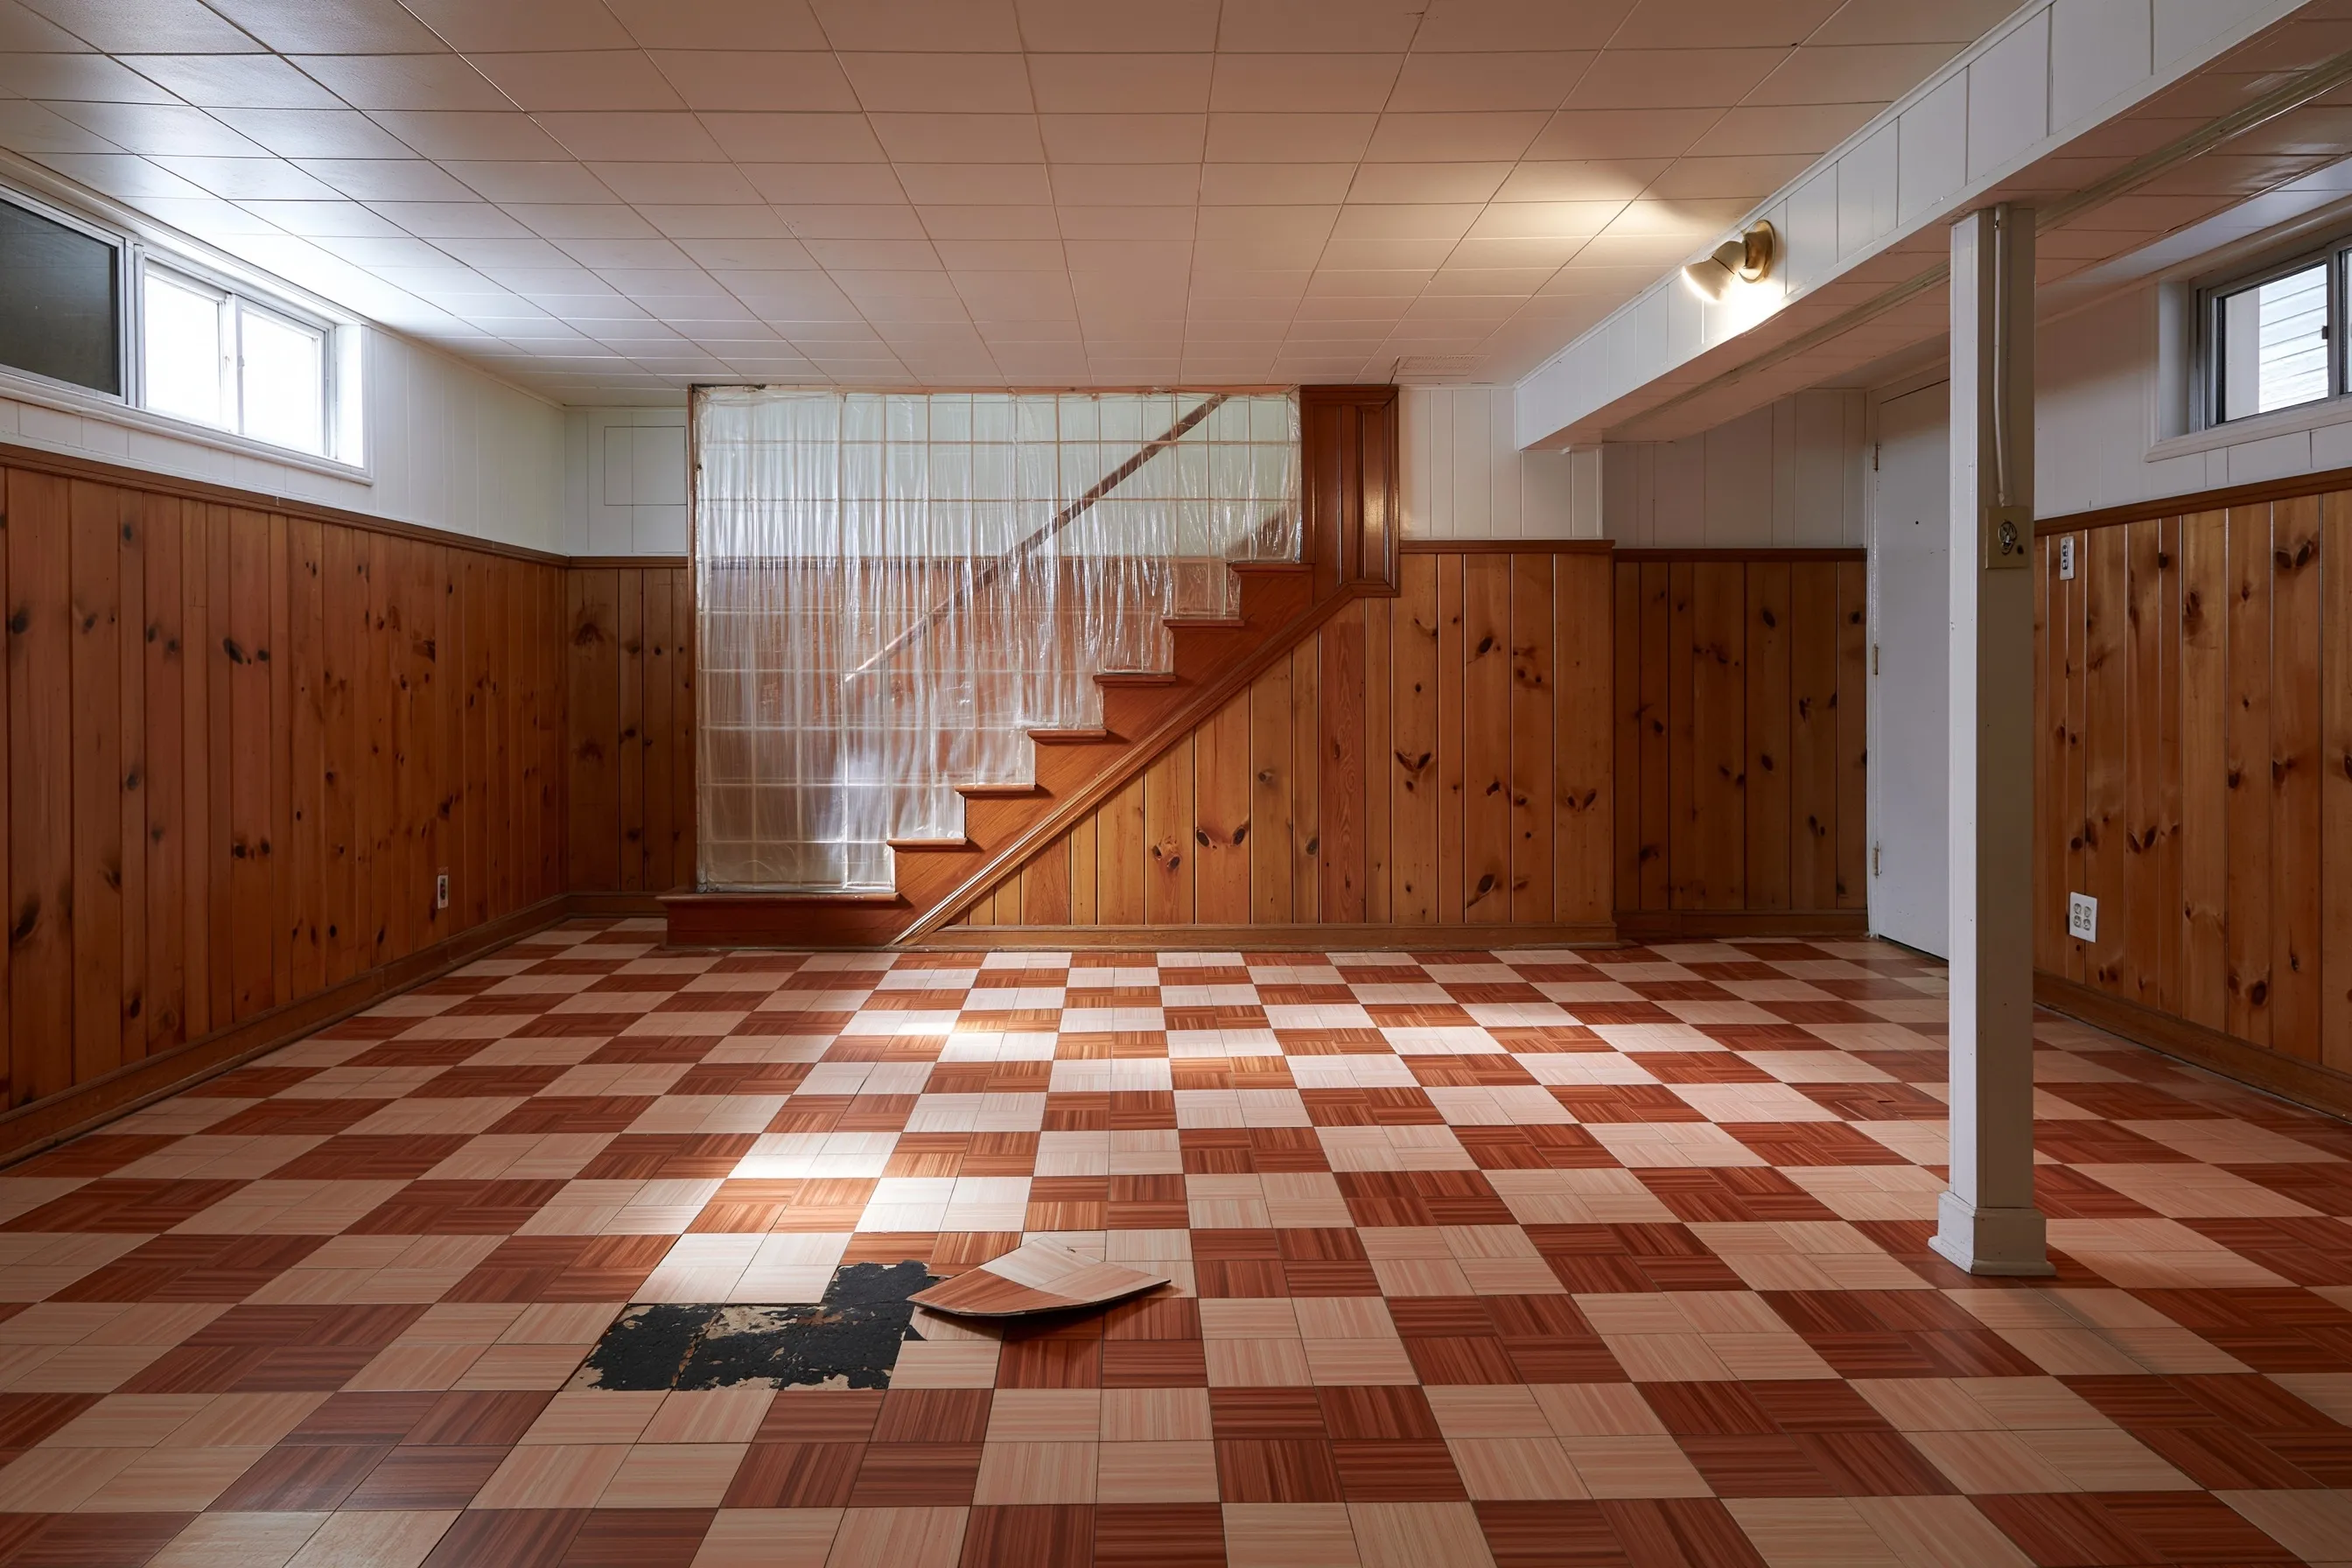
Checkerboard tile floor in a 1950s basement playroom, one square lifted and the black glue showing beneath
Home
1950s house in Kent with a full basement
Original request
An interior drain along the basement walls to stop seepage
Testing
A square from near the wall and the glue under it, both positive
Area
A strip about 18 inches wide along the walls, about 90 sq ft
Agency notice
None needed while the squares come up unbroken
Timeline
One day of removal, then the drain crew cuts the slab
Cost
$2,200

Scope of work

Plastic along the walls, the tile lifted wet in the strip the drain crew will cut, the adhesive scraped, the edge of the remaining tile left whole, sealed bags, disposal and a HEPA clean. Sawing the slab and fitting the drain are the waterproofing company’s work.

Project overview

In this example, water seeps in along the walls of a 1950s basement in Kent, and the owners plan an interior drain. The crew will saw through the slab along the walls, right through the old checkerboard tile. Samples of the squares and of the glue beneath them are both positive.

Cutting would turn the tile into dust, so a strip about 18 inches wide comes up first, wet and whole, with the adhesive scraped off. The rest of the floor stays, its edge left clean. Whole squares are not something the agency needs to hear about.

The goal

The goal is a clean strip of bare slab for the drain crew, with the rest of the old floor left whole.

Process

  1. Before work Tile and adhesive sampled; the drain crew marks the cut line.
  2. Morning Plastic along the walls, tile lifted wet in the strip, bagged.
  3. Afternoon Glue cleaned off the 18-inch band, the band vacuumed, the cut edge of the floor looked over.
  4. Then The drain crew saws the slab and installs the drain.

Planning right

  • A crew that cuts the slab through old tile spreads it as dust. Lift the tile first.
  • Ask the drain crew how wide their cut will be, so enough tile comes up.
  • The rest of the tile can stay as long as it is whole.
  • Move stored items away from the walls before the crew arrives.

Get a free quoteMore about asbestos floor tile and mastic removal

Request a free asbestos removal quote

We recommend calling, but do feel free to contact us using this form. We'll get back to you with a free, personalized quote or additional questions as soon as possible. We're here to help.

Call (253) 893-4144

Call (253) 893-4144